
Building a Rasperry Pi media center is the perfect way to get the home theatre PC experience for a budget. For under $100, you will have a unit that can play most multimedia formats, supports XBMC and only uses about 5w of power. Our guide will take you through the entire process of building your Raspberry Pi media center, from buying all the components to setting up XBMC.
Items you will need for the Raspberry Pi Media Center:
Required Components
- Raspberry Pi (At least a Model B
is recommended, Model B+
preferred)
- Power supply offering at least 1a (2a preferable)
- Micro USB cable
- SD Card (Class 10 preferred). Micro SD Card is required if you have a Model B+
- HDMI cable
- Keyboard and mouse for setup
- SD Card Reader
Optional Components
- Wifi Dongle
- USB Remote Control
- Powered USB hub
- Raspberry Pi Case
So why the particular Raspberry Pi models?
We’ve recommended the Raspberry Pi Model B at a minimum due to its in-built Ethernet support. This makes it much easier to set up should you be having wireless issues (for example, if your wireless dongle requires too much power or you can’t get a stable connection). Furthermore, the new Raspberry Pi Model B+ provides a high current USB mode making it more suitable for a Raspberry Pi media center due to its ability to power USB harddrives as well as wireless dongles that are more power hungry. However, these instructions will equally work for the Ethernet-less Model A. However, a full image install may be preferable.
Choosing a case
Choosing a case for your Raspberry Pi media center can be daunting with the array of cases on the market. We are big fans of the ModMyPi cases, due to its stylish look and venting. Another top pick is the basic case from Element14 due to its low cost and secure grip on the Pi, although getting the Pi into the case initially can be a challenge due to the clips.
Those of you who are lucky enough to own the new Raspberry Pi. MODEL B+ don’t have as many case choices as it only came out recently, although both ModMyPi and Elements cases look appealing.
Choosing a memory card
Some of you are probably wondering why we emphasised a Class 10 SD card over some or the cheaper alternatives. This is because the class of the SD Card refers to its minimum write speed. The higher the class, the faster guaranteed write speed you have. This means that data (i.e. Downloads, fanart, etc) can be copied to the SD card faster, leading to improved performance. Similarly, Class 10 Cards often have better read speeds too, meaning loading fanart should be faster.
Building your Raspberry Pi Media Center
Step 1: Installing the OS
Easy Method: Use the Raspbmc Installer
The first step in building your Raspberry Pi Media Centre is to get the Operating system. We have chosen Raspbmc for our Raspberry Pi media center due to its ease of installation, extra features and the simplicity of adding codec licenses.
Download the Raspbmc installer from the website, unzip it and double-click the “setup.exe” file. This will extract the Raspbmc installer to the current folder. When this is complete, double-click “installer.exe” and you will be presented with the screen below:
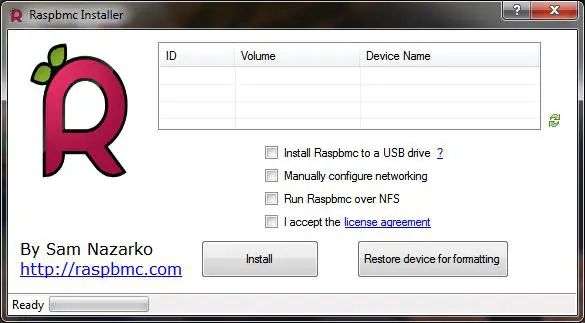
Insert your SD card into your reader and select your SD card in the list. If your SD card doesn’t appear, click the “Refresh” button on the right. Make sure you have selected the correct device as this process will wipe the SD card contents and we’ve heard a few horror stories of precious photos being lost.
Check the license agreement box (after reading it of course!) and click “Install”. The installer will download a minimal Raspbmc image which is sufficient to boot, but does not contain XBMC. It will be downloaded automatically on the first boot.
Alternative Method: Full Image Install
On the Raspbmc website, full images are available. Using a tool such as Win32DiskImager, burn the image to your SD card.
Once you’ve got your Raspberry Pi media center SD card ready, insert it into the Raspberry Pi’s SD card slot.
Step 2: Connect everything up and boot your Raspberry Pi media center
Your Raspberry Pi media center is almost ready to go. Now you just need to connect it all up.
Plug in your HDMI cable into the Raspberry pi and your TV, connect the power cable to your power supply and into the Pi’s micro USB port and connect the Ethernet cable to a spare network port.
Now plug in your power supply. Your Raspberry Pi media center should boot up automatically, showing a color spectrum before automatically starting to download XBMC and install it. This may take some time depending on the speed and type of connection.
When this is complete, your Raspberry Pi media center should be ready to use, with XBMC appearing on your screen.
Step 3: Configuring your multimedia sources
Adding media sources to your Raspberry Pi media center is easy. Simply navigate to videos and select “Add Source”. Local sources can be readily selected using the folder browser. Network locations will most likely need to be typed in unless you are in the same work group.
Adding Codecs
Your Raspberry Pi media center is capable of playing a diverse set of media formats. However, some of these require licenses. The Raspberry Pi Foundation elected to support h.264/AVC and MPEG-4 ASP.
MPEG2 or VC-1 was not included but the licenses can be purchased from the Foundation economically here. The licences are linked to the specific serial number of your Pi and thus, are not transferable between devices.
MPEG2 is used for DVDs and some Blurays, whereas VC-1 is less common and is arguably not worth the cost unless you have VC-1 files already or want to further support the foundation. When purchasing a codec, you will get a code that can be added into the Raspbmc settings app and then reboot. When Raspbmc boots back up, you will be able to play back videos with the purchased codecs.
Enabling High Current USB Mode (Model B+ Only)
To enable the high current USB mode if you have a Model B+, simply select the “Boost USB Current” option in Rasbpmc Settings
Conclusion
Now you’ve got your Raspberry Pi media center set up, all you need to do now is put on a movie, grab a drink, sit back and enjoy your hard work.
Like this article? Please like and share!
Photo Credit: Pete Slater /Edited from Original
