Reviews

BlitzWolf BW-LT1 LED Lamp Review: The Ultimate Gadget Fan’s Lamp?

The BlitzWolf BW-LT1 is an 48 LED lamp from the company that offers a range of lighting modes, touch interface and a USB port for charging your gadgets. Is it a useful gadget or waste of money? Read our BlitzWolf BW-LT1 review to find out!

I want to say thanks to Banggood for sending me a sample to review

Check Price

What’s Inside The Box?

BlitzWolf-BW-LT1-Review-Inside-The-Box

Inside the box, you’d get everything you’d expect

  • 1x BlitzWolf BW-LT1 Lamp
  • 1x Power Adapter
  • 1x Instruction Manual
  • 1x Warranty Card

The lamp itself comes in 3 pieces that need to be assembled. It only takes a few seconds. Insert the lamp into the base and attach it using the screw cap.

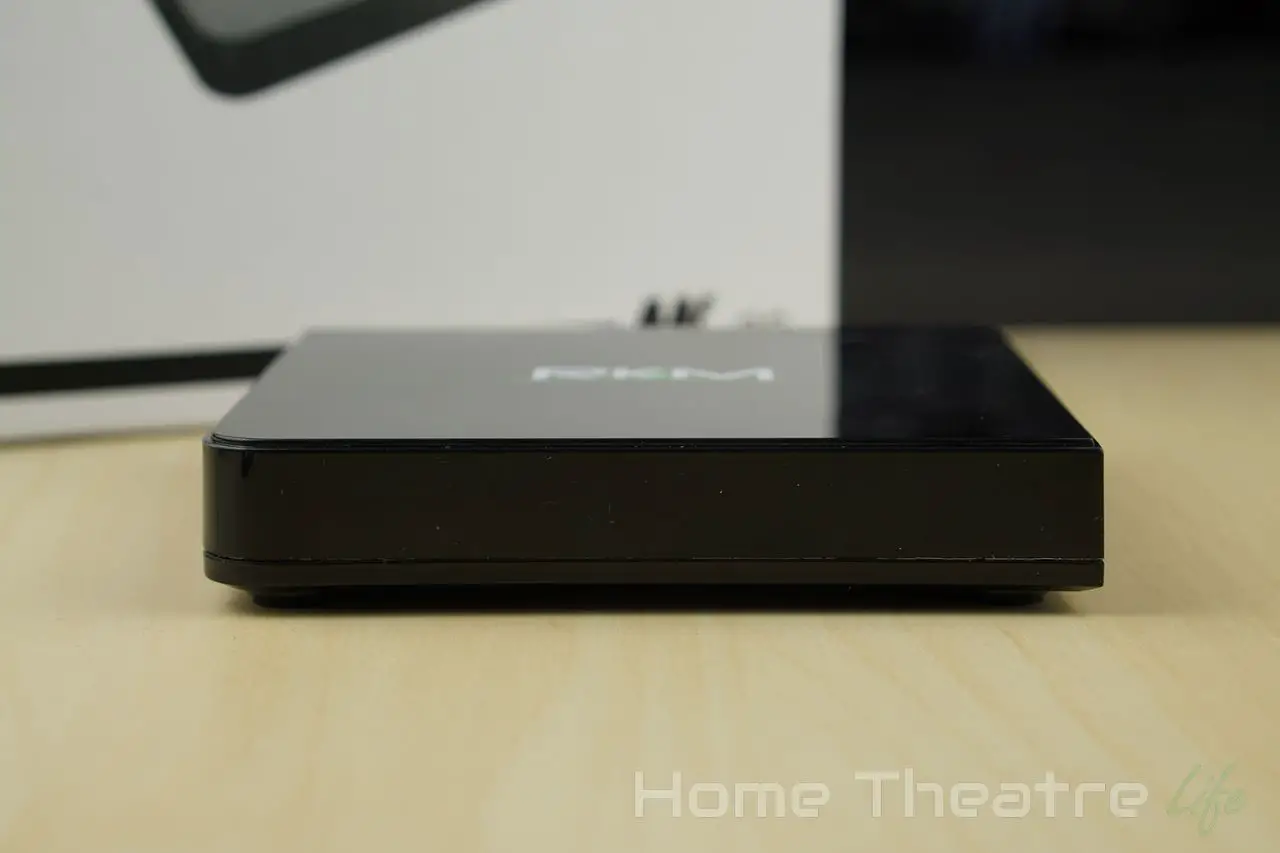
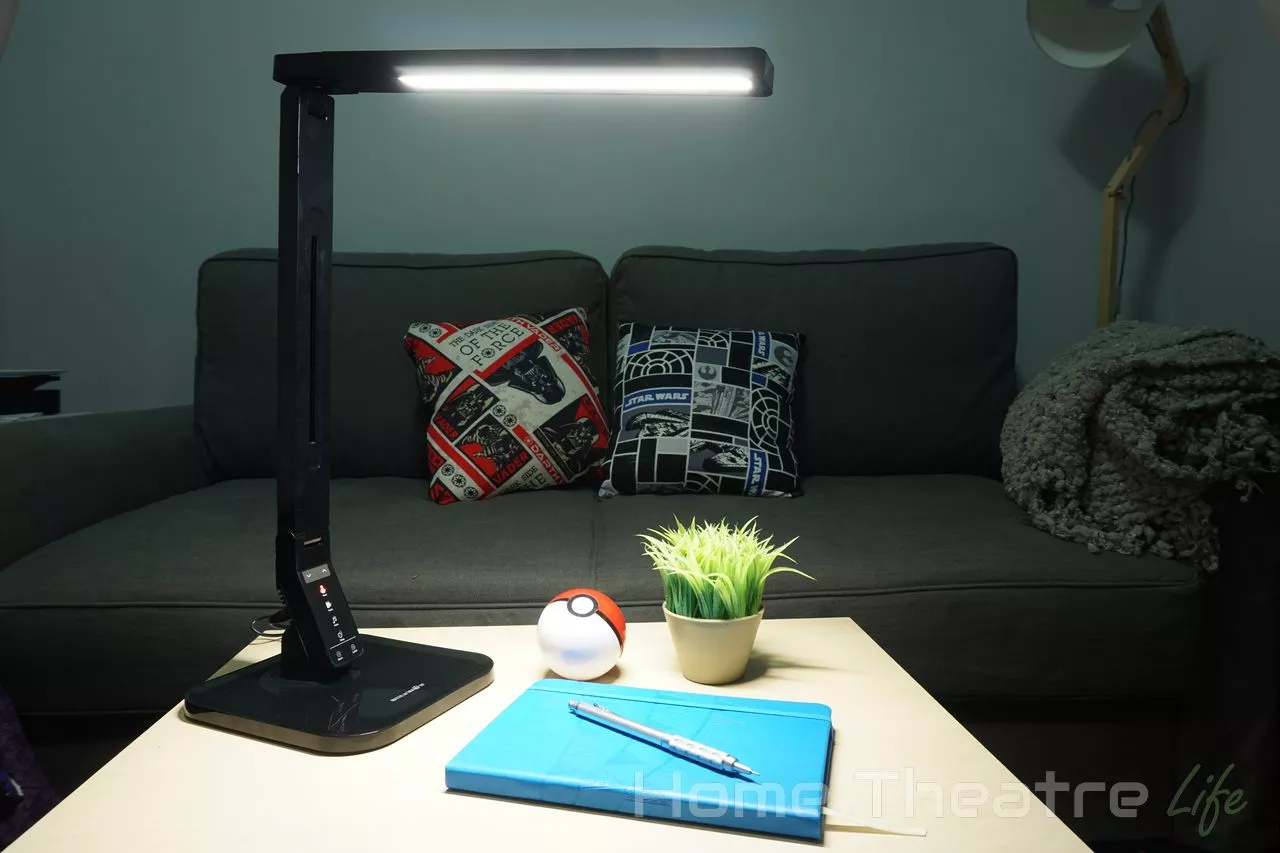
BlitzWolf BW-LT1 Review: Design

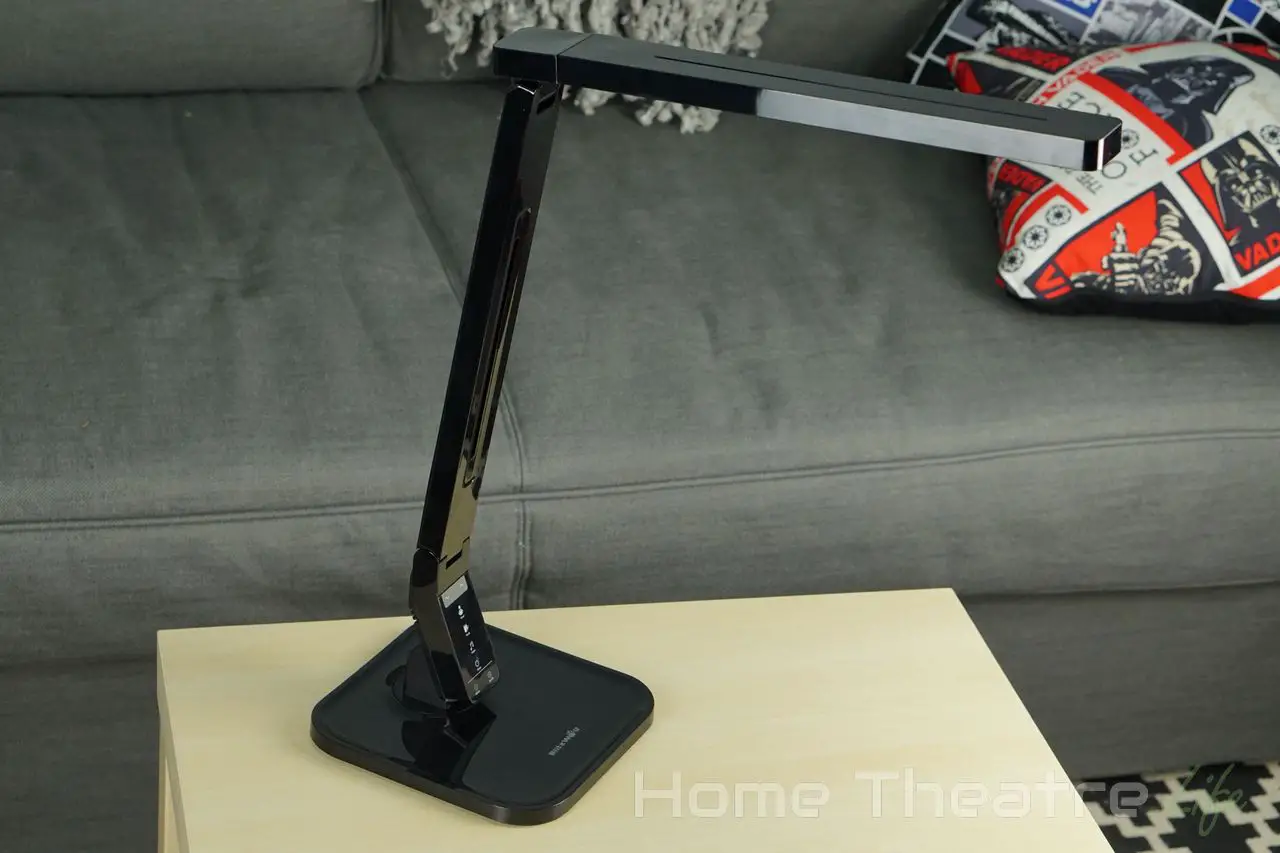
The Blitzwolf BT-LT1 definitely follows modern stylings,  using a minimalist design with clean lines.

The whole unit is made of glossy black plastic that looks fantastic out of the box. However, if you’re handling it regularly, expect it to be covered in fingerprints.

BlitzWolf-BW-LT1-Review-03

The lamp is designed to be as flexible as possible. When not in use, you can fold it down onto itself, collapsing down to a fraction to its size.

There’s actually three separate hinges, allowing a remarkable amount of flexibility. The bottom hinge allows for 40 degrees, the middle allows for 140 degrees whilst the top lamp section itself can also rotate 180 degrees.

The whole lamp itself can rotate a 180 degrees on its base, allowing you to get the light where you need it.

BlitzWolf-BW-LT1-Review-09

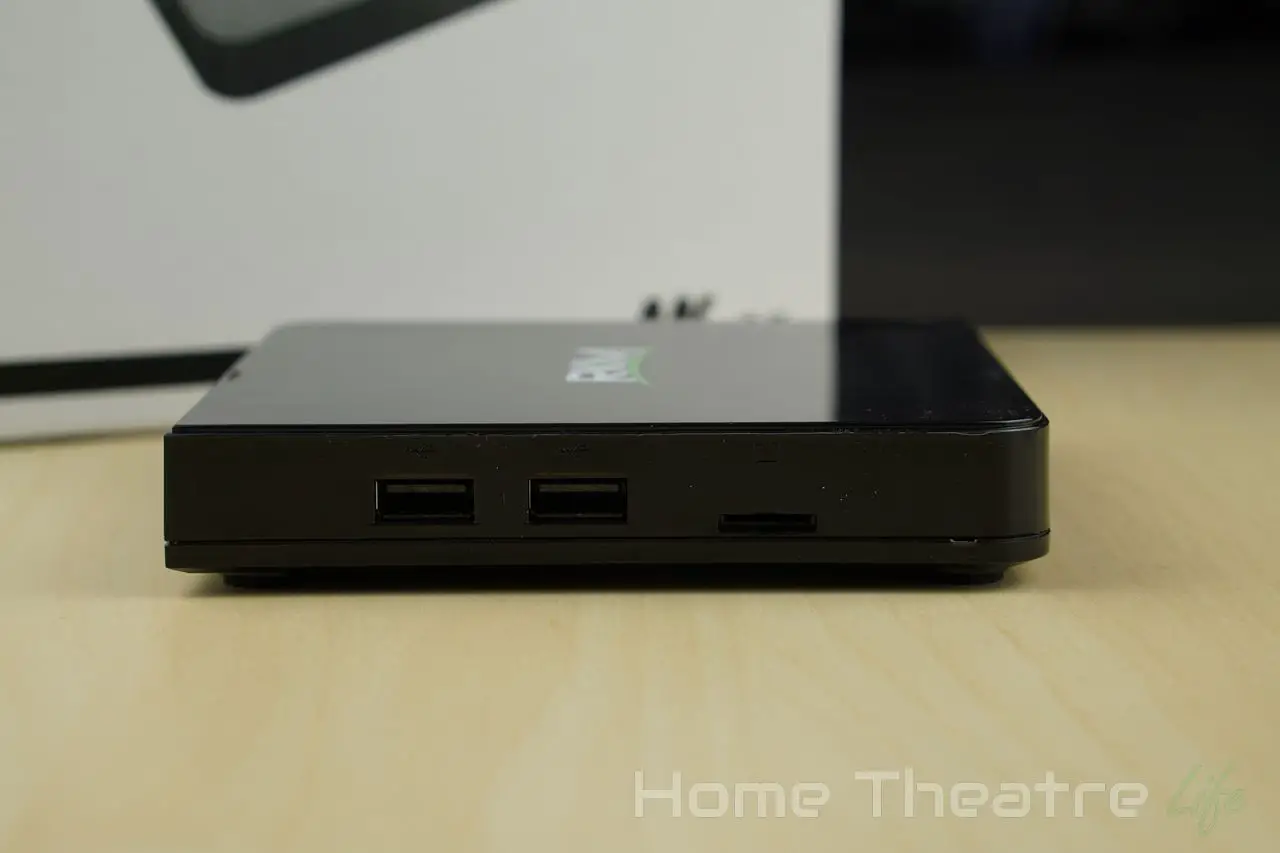
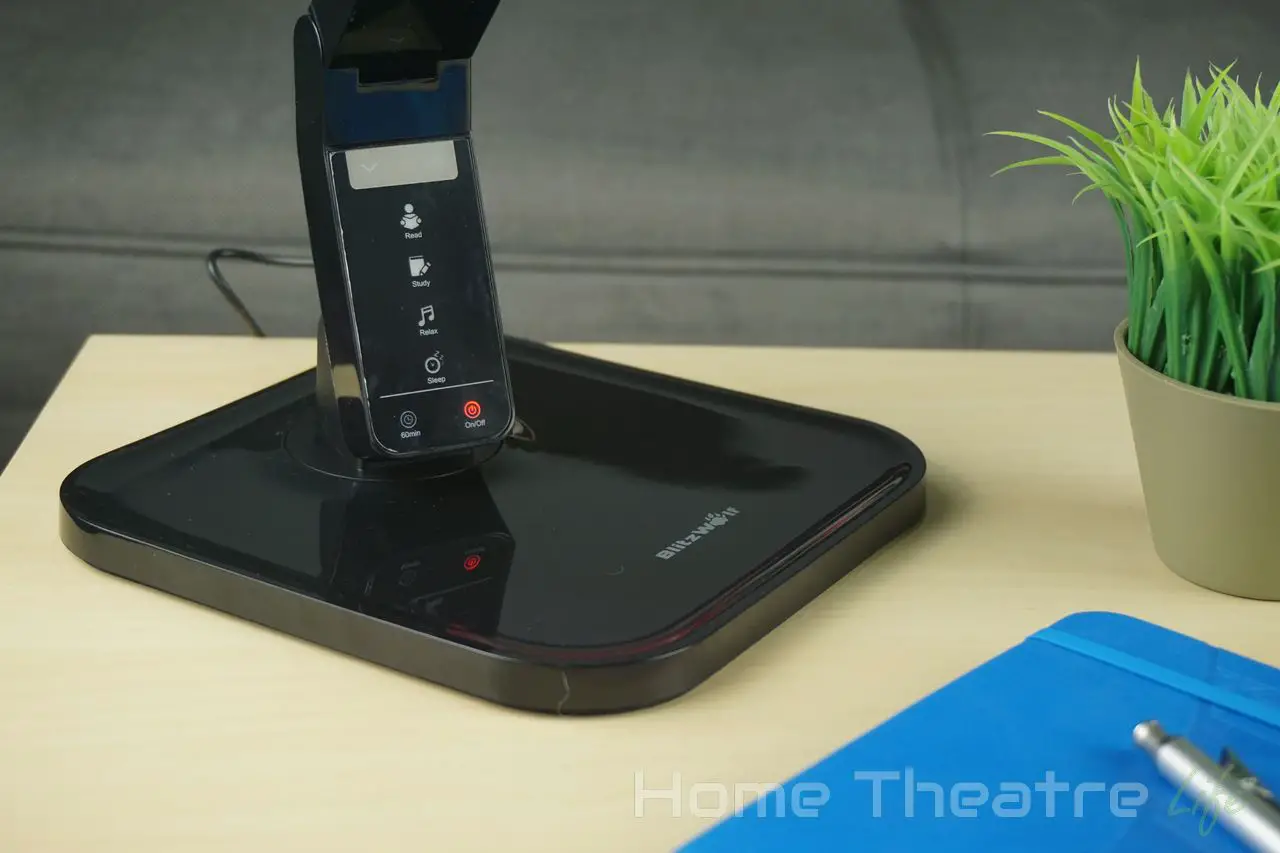
The angled control panel is located at the bottom of the unit. It features a touch interface, with “buttons” for brightness, the four lighting modes, power and the sleep timer.

BlitzWolf-BW-LT1-Review-Controls-01

It also houses a 2.1A USB port for charging your gadgets around the right side but more on this later.

The lamp’s base is heavy and the rubber and foam padding protects your desk and makes sure the unit doesn’t move.

BlitzWolf-BW-LT1-Review-05

BlitzWolf BW-LT1 Review: Using It

The lamp comes disassembled in the box. Putting it together is easy. Just slide the lamp body into the base, using the screw-on cap to lock it into place. Plug in the power and when the red power LED is on, you’re ready to go.

BlitzWolf-BW-LT1-Review-Controls-02

The touch panel is quite responsive and I rarely had any issues. Though I did notice that the power button occasionally didn’t respond if I was pressing the power button in quick succession. Given that you’re unlikely to try and use the lamp for a rave, it’s not really a big issue but worth mentioning nevertheless.

There’s four lighting modes on offer here, called Read, Study, Relax and Sleep. It’s clear that BlitzWolf have been paying attention to the recent studies on light temperature. Whilst the Study mode uses a cool white light, believed to improve focus and energy, the sleep mode opts for warmer tones. Similar ideas have shown up in the popular F.lux application and Apple’s new Night Shift Mode.

BlitzWolf-BW-LT1-Review-Color-Temperatures
Clockwise from Top-Left: Read, Study, Relax and Sleep

Each light mode offers 5 brightness levels offer enough flexibility to get a comfortable amount of lighting.

There seems to be a built-in memory for each light mode so the lamp will actually keep track of the brightness per mode which is pretty awesome, particularly if you like it bright for working but dim if you’re wanting to go to sleep. It only works whilst plugged in though so be aware that unplugging it will reset it.

There’s also a 60 minute sleep timer for those that need it which is handy if you want to use it as a side table lamp, though it would have been nice to have shorter times available as I felt 60 minutes was way too long.

Blitzwolf claim that their LEDs offer a CRI (Color Rendering Index – a measure of how accurately a light source reveals colors) of above 90, suggesting that the light should be able to reveal colors faithfully. This makes the light perfect for those working with colors regularly, such as photographers, videographers and graphic designers.

BlitzWolf-BW-LT1-Review-Charging

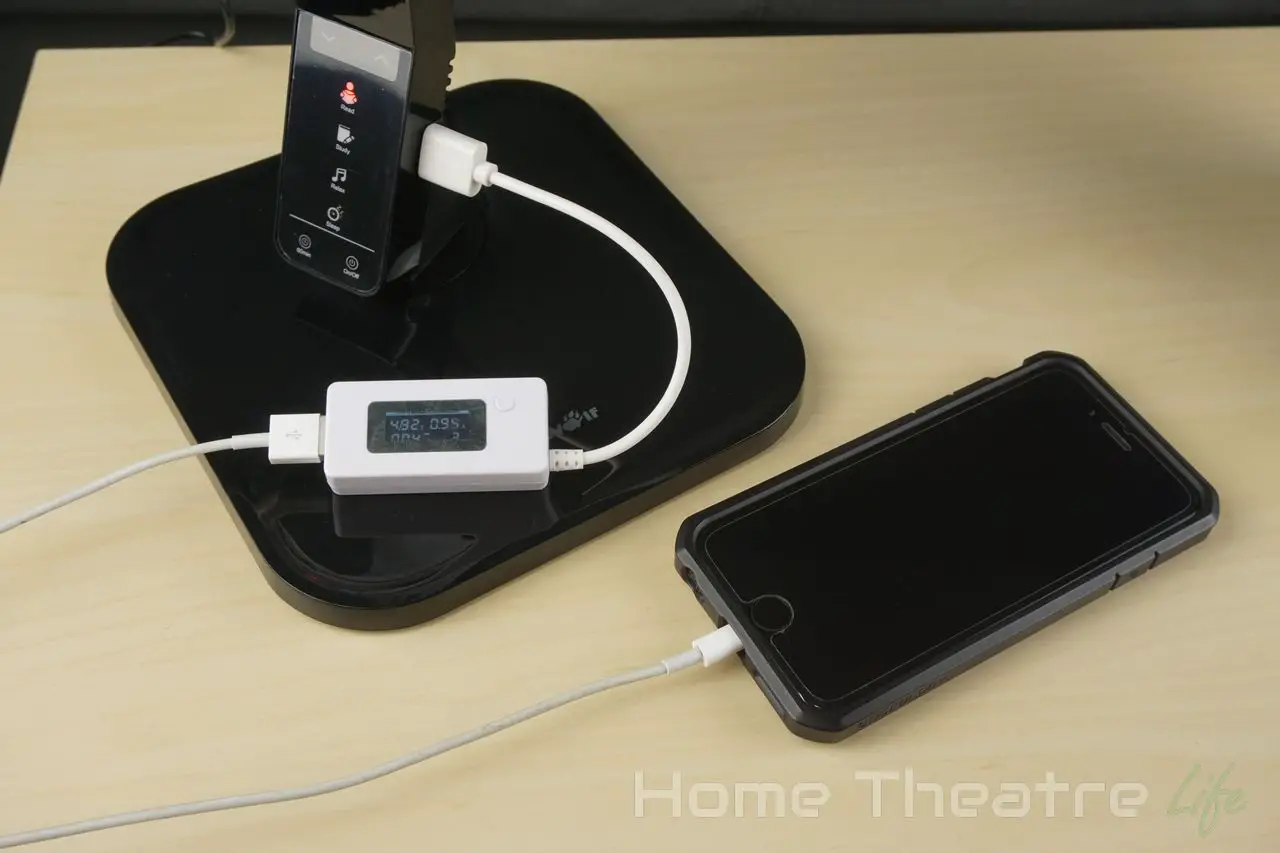
The USB charging port worked but I wasn’t able to achieve the 2.1a current draw that Blitzwolf claims the lamp is capable of outputting but this could be due to the various devices I tried to charge. My USB power meter only registered a draw of 0.95A when my iPhone 6 was connected. Voltage output generally hovered between 4.9-4.95V which remains within USB’s 5V specifications.

Verdict

BlitzWolf-BW-LT1-Review-02

I was impressed with the BlitzWolf BW-LT1. It’s a little pricey for some, but the amount of flexibility on offer here, combined with a stylish design makes it a solid contender.

From the 48 LEDs that sip power to the various lighting modes that let you tailor the lighting to your needs, if you’re wanting a lamp that does more than just provide light, I’d strongly recommend taking a look.

Getting One

You can purchase the BlitzWolf BW-LT1 from Banggood.

Check Price at Banggood

Alternatively, it’s available from Amazon.

Blitzwolf BW-MP1 LED Projector Review: It’s Amazing How Much $100 Gets You

The Blitzwolf BW-MP1 is a small LED projector with a variety of intelligent features built in for under $100. Sporting an 800×480 pixel resolution, 1200 lumens of brightness and built-in wifi, is this the ultimate budget projector?

I want to say thanks to Banggood for sending me a sample to review.

Check Price

Blitzwolf BW-MP1 Video Review

What’s In The Box?

Blitzwolf-BW-MP1-Projector-Review-Inside-The-Box

Blitzwolf have given you everything you need to get started:

  • 1x Blitzwolf BW-MP1 LED Projector
  • 1x IR Remote
  • 1x Composite Cable
  • 1x Power Cable
  • 1x English User Manual

Blitzwolf BW-MP1 Projector Review: Design

The Blitzwolf BW-MP1’s design keeps the standard projector stylings. It’s a medium-sized rectangle with some raised geometric features that add character.

Blitzwolf-BW-MP1-Projector-Review-Logo

The front sports the unit’s large projector lens – protected by a rubber lens cap that’s only held in place by friction. As such, it has trouble staying in place and won’t grip unless the lens is fully retracted. I wish the company opted for a more robust system, particularly given that they’re positioning it as portable.

Blitzwolf-BW-MP1-Projector-Review-Front

Just above the lens is two dials for focus and keystone correction to get the best  image possible.

Blitzwolf-BW-MP1-Projector-Review-Focus

There’s also a set of controls on the unit for navigating menus and controlling media playback.

Blitzwolf-BW-MP1-Projector-Review-Buttons

Ports are located on the right and rear sides. The right side features a 3.5mm audio output jack, composite video output, HDMI In, an SD card slot and two USB ports, although one can only be used for charging devices whilst the other can be used for media playback.

Blitzwolf-BW-MP1-Projector-Review-Right

The back of the unit has an IR sensor and VGA port (tucked under the rear vent).

Blitzwolf-BW-MP1-Projector-Review-Back

If you can’t mount  the projector directly in front of the screen, there’s a small riser that will allow you to angle the projector up. It’s a pretty handy solution to a common problem, particularly if you’re using it portably.

Blitzwolf BW-MP1 Projector Review: Using It

The projector is switched on via the post button at the top of the unit. It takes a few seconds to boot up before you see the menu.

The first thing you’ll notice is the sound of the fan that keeps the unit cool. It’s not exactly quiet so prepare to hear it during quiet scenes. However, it’s quieter than other cheap protectors such as the UNIC UC40.

The UI is exactly the same as the one seen in projectors such as the UNIC UC46. It’s bright and colorful, with separate tiles for movies, photos, music and text.

Blitzwolf-BW-MP1-Projector-Review-UI-01

The file browser is functional but nothing special. Icons represent files and folders, though I wish the file/folder icons were more distinctive to make it easier to tell them apart. One thing that was frustrating (and was the same with the UNIC UC46) was that you need to press the play button to start playing a video as the OK button just adds it to the playlist. It feels like either OK or Play should be able to start the video.

Blitzwolf-BW-MP1-Projector-Review-UI-02

The unit’s media player handles the most common codecs well. I was able to play 30fps H.264 videos, MPEG2 and the like, though don’t expect more demanding videos to work. 4K H.264, H.265 and Hi10p samples didn’t play at all.

Also note that Dolby audio isn’t supported so those files play without audio. If you need Dolby audio, you’ll either need to transcode the files or add a dedicated media player.

Blitzwolf-BW-MP1-Projector-Review-UI-04

Blitzwolf BW-MP1 Projector Review: Image Quality

As with my other budget projector reviews, I’ll prefix this section by saying that it’s important to remember I’m talking about a sub-$100 projector and image quality won’t be as good as a proper home theatre projector. That said, they also cost significantly more so it isn’t really fair to put them face-to-face.

The Blitzwolf BW-MP1 claims to offer 1200 lumens of brightness but it isn’t enough to produce a bright image in a well-lit room.

Blitzwolf-BW-MP1-Projector-Review-Image-Light

Turning off the lights makes a massive difference however, with a bright image with colors that are fantastically vivid.

Blitzwolf-BW-MP1-Projector-Review-UI-01I was able to project a fairly large image too. At around 2.5m away, I was able to project an image equivalent of a 90+ inch screen which is great for an immersive viewing experience.

Out of the box, picture quality is average with everything looking awful and oversaturated regardless of which image preset you choose.

Blitzwolf-BW-MP1-Projector-Review-Picture-OOTBHowever, after adjusting the picture settings playing with the settings, I was able to get a really nice looking image, with lots of detail.

Blitzwolf-BW-MP1-Projector-Review-Picture-01The projector’s 800×480 pixel resolution is on-par with DVDs. Most of you will be used to glorious 1080p so the drop in image quality can take some getting used to but there’s enough detail for movies or gaming.

Blitzwolf-BW-MP1-Projector-Review-Picture-02The image sharpness does soften towards the edges of the image and using keystone correction makes this worse (due to how these units do the keystone correction). The effect is particularly noticeable where fine detail is involved such as on the menu but it’s not significant enough to make it unreadable.

Blitzwolf-BW-MP1-Projector-Review-Keystone

Blitzwolf BW-MP1 Projector Review: Audio Quality

The Blitzwolf BW-MP1 features a tiny 1.5W downward firing speaker, making the unit pretty much plug and play. However, the speaker performs about as well as you’d expect, lacking bass and sounding tinny. I’d strongly recommend hooking up a good quality speaker such as the Blitzwolf F1 Bluetooth speaker via the projector’s 3.5mm audio output.

Blitzwolf BW-MP1 Projector Review: Wireless Streaming

One of the biggest features of the Blitzwolf BW-MP1 is “BW-Link”. This is a wifi-based streaming solution that allows you to stream content via Miracast, DLNA and Airplay without any wires.

Blitzwolf-BW-MP1-Projector-Review-BW-Link

Setting it up is simple. Just connect to the SSID on the screen and then navigate to the provided IP address to get to the projector’s web interface.

The web interface itself is hideous and really hurts the device’s presentation. It looks like something you’d expect to see on Geocities, complete with terrible GIFs and a lack of design consistency. It’s the same as the one on the UNIC UC46 but I’d hoped Blitzwolf would have fixed this up.

UNIC-UC46-Review-Web-UI

In it, you can set up wifi, switch between DLNA and Miracast streaming and use a web-based remote. That said, I couldn’t wait to never use the interface again and you really don’t need to once you’re hooked up to your wifi network thankfully.

The actual streaming part worked really well. Video streaming from my server using BubbleUPNP worked flawlessly. 720p and 1080p H.264 videos streamed via WiFi without any buffering.Blitzwolf-BW-MP1-Projector-Review-BW-Link

Miracast worked fine with my Samsung Galaxy S4, allowing me to mirror my screen easily.

AirPlay and AirPlay mirroring also worked well on my iPhone 6 running iOS9. I did have the occasional issue where the next video wouldn’t play but this is sadly common with most unofficial Airplay implementations.

Should You Get One?

Blitzwolf-BW-MP1-Projector-Review-04

The Blitzwolf BW-MP1 is a great budget LED projector and a steal at its sub-$100 price tag. For such a low price, you’re getting a unit that’s capable of outputting a nice and large picture in addition to a variety of useful features such as the in-built media player and wireless streaming functions. Whilst an awful web UI and disappointing image presets let down the package, you’re getting a great source of entertainment for a reasonably small outlay.

Getting One

You can get the Blitzwolf BW-MP1 from Banggood for around $99.

Check Price at Banggood

Alternatively, it’s available from Amazon.

Mipow LED Smart Bulb Review: $14 Bluetooth-Controlled Light Bulb

The Mipow LED Smart bulb is one of a growing number of smart appliances. Featuring an inbuilt Bluetooth radio, RGB LEDS and an E27 screw, is the Mipow LED bulb a must have accessory or a useless gadget? Read our Mipow LED Smart bulb review to find out.

I want to say thanks to GearBest for sending me a sample to review.

Check Price at GearBest

What’s In The Box?

Mipower-Smart-LED-Bulb-Review-Inside-The-Box

There’s really not much to say about inclusions as I wouldn’t expect too much to be packaged up with a light bulb.

Inside the box, you’ll get:

  • 1x Mipow LED Smart Bulb
  • 1x English instruction manual.

Mipow LED Smart Bulb Review: Design

For a change, I really can’t say much about the product’s design. It looks light a slightly more modern light bulb.

Larger than a standard light bulb, the Mipow bulb is cylindrical. Most of the bulb is made of metal, with a white translucent cap to diffuse the RGB LEDS and lead to more uniform color distribution.

Mipower-Smart-LED-Bulb-Review-03

It looks nice and would fit well in most modern light fittings that favour exposed bulbs.

However, the light beam is slightly more directional than a traditional bulb due to its design.

The bulb is only available as an E27 screw so you’ll need to make sure your lamp or light fitting supports it or get pick up an appropriate adapter.

Speaking of fitting, you’ll need to make sure you’ve got enough clearance to fit the bulb in. I didn’t have any issues but some smaller lamps may not have enough room to accomodate the smart bulb’s slightly larger frame.

Mipow LED Smart Bulb Review: Using It

Using it is dead simple. Just screw the bulb into your  light and turn it on. The bulb will automatically switch on its Bluetooth radio, ready to connect with the Playbulb X app on your smartphone (Available on Android and iOS).

The bulb is set to white initially but stays on the last color next time you turn it on thanks to its inbuilt memory.

The light’s 5W of power is distributed between 10 warm white LEDs and 4 RGB LEDs, leading to much more light when used “traditionally”, rather than colored. The white light is good enough for normal use (~280 lumens). When colored, it’s works well for changing the look of a room. I got some pretty cool effects using it to light up the back wall of my home theatre.

Mipower-Smart-LED-Bulb-Review-Colors-01

The light bulb is controlled entirely from the app. Those looking for support for web services such as IFTTT will be disappointed, though the unit is a fraction of the cost of bulbs that support web services.

Mipower-Smart-LED-Bulb-Review-App-01

After selecting a specific light (or a group of lights you’ve created, up to 5), you’ll get a color wheel that lets you set the bulb’s color to any of the supported 16 million colors.

There’s also presets for red, green, blue and white, a slider for setting the brightness, from max to completely off and a toggle that changes the bulb’s color when you shake your smartphone.

Mipower-Smart-LED-Bulb-Review-App-02


The app generally works well but lacks a little polish. The light bulb responds surprisingly quickly and everything is pretty intuitive. I did experience the occasionally oddity such as the color change in Candle mode not working or rarely the app didn’t connect to the bulb on the first tap but these are minor issues.

Mipower-Smart-LED-Bulb-Review-Colors-03

There’s also a couple of lighting effects to spice things up: pulse, rainbow, different rainbow (!?) and candle. They all look pretty cool, though the flicker effect in candle mode is too subtle unless you’re in complete darkness.

Speaking of flicker, there really wasn’t any noticeable during testing. The light from the Mipow Smart LED bulb remains consistant.

Mipower-Smart-LED-Bulb-Review-Colors-02

You can schedule the bulbs to turn on and off at a certain times but complex schedules aren’t supported, like different on/off times on the weekend.

If you’ve got Mipow’s other products (such as the Mipow Playbulb candle), there’s some pretty cool integration such as color sync and blowing out the candle can actually turn off every other item in the group.

Should You Get One?

Mipower-Smart-LED-Bulb-Review-02

The smart lighting movement is growing rapidly and the Mipow LED Smart Bulb is a great way of dipping your toes in without breaking the bank at a measly $14.

Though it lacks more advanced features such as IFTTT integration, it’s also a fraction of the price of more advanced alternatives such as Philips’ Hue range.

If you’re wanting to play around with LED smart bulbs, you can’t go wrong with the Mipow LED Smart Bulb.

Getting One

The is available from GearBest for under $15.

Check Price at GearBest

Tronsmart Mars G01 Wireless Controller Review

The Tronsmart Mars G01 wireless controller is the company’s sole gaming product but one that complements their TV box products well. Borrowing pretty liberally from the Xbox 360 controller’s design whilst packing in both Android and Windows compatibility (including D-Input!), is Tronsmart’s controller any good? Read our Tronsmart Mars G01 review to find out!

I want to say thanks to GeekBuying for sending me a sample to review.

Check Price at GeekBuying

What’s In The Box?

Tronsmart-Mars-G01-Review-Inside-The-Box

Tronsmart have packed in an impressive collection of goodies inside the box:

  • 1x Tronsmart Mars G01 wireless controller
  • 1x USB Wireless Reciever
  • 1x Micro USB OTG cable
  • 1x Micro USB Charging Cable
  • 1x Carry Bag
  • 1x Instruction Manual

Tronsmart Mars G01 Review: Design

As I mentioned at the start of the review, the Tronsmart Mars G01 looks like the Xbox 360 and PS4 controller had a baby. It borrows heavily from the Xbox 360 controllers’ well-liked design whilst adding some tweaks for usability.

Tronsmart-Mars-G01-Review-08

The controller’s wings sit comfortably in the hands and the addition of rubber fins along the sides is a nice touch. They both assist with grip and help keep your hands cool if you get sweaty hands.

Tronsmart-Mars-G01-Review-05

There’s the full suite of buttons here. There’s two analog sticks, a d-pad, four face buttons and four shoulder buttons, two of which are analog triggers. Start and select buttons are also present.

The face buttons follow the Xbox’s ABXY layout and are made of clear plastic, with colored embossed letters. It looks fantastic.

Tronsmart-Mars-G01-Review-02

There’s also a Tronsmart button that doubles up as the power/mode button, as well as a set of four LEDs that show which mode the controller is in.

There’s also a micro USB port located at the top which is for charging the internal 600mAh battery.

Tronsmart-Mars-G01-Review-06

The Tronsmart Mars feels like its relatively well made, with a solid frame and comfortable form factor. I did find the triggers squeak a when pressed slowly but this doesn’t affect gameplay.

Tronsmart Mars G01 Review: Using It

As a 2.4Ghz wireless controller, setup is as simple as plugging in the tiny USB wireless receiver and turning on the controller by holding down the “T” button on the centre of the controller.

Tronsmart-Mars-G01-Review-07

The controller will automatically boot into the last mode it was on. Holding down the “T” button will toggle through the various supported modes including X-input, D-input and an Android-specific mode.

Most Android devices should automatically recognise the Tronsmart Mars G01 as a controller and be ready to use in supported games or emulators. I didn’t have any issues playing Beach Buggy Racing and Riptide GP2 on my UGOOS UT3S.

Tronsmart-Mars-G01-Review-09

Using it in Windows is just as easy, with Windows 10 recognising the controller as an Xbox 360 controller. I tested it out in Sleeping Dogs and had no issues. The triggers are correctly detected as being analog.

There’s also D-Input support for older games which is great. I fired up the original Grand Theft Auto San Andreas (before X-Input support was patched in) and everything worked as expected, though I did need to remap some of the controls.

Tronsmart-Mars-G01-Review-03

Speaking of controls, they feel nice and responsive, with satisfying actuation. The analog sticks feel good too. However, I found the d-pad was a little stiff. It didn’t affect my ability to pull off combos in fighting games, but it wasn’t as pleasant as other controllers.

Tronsmart-Mars-G01-Review-10

Range was good thanks to the use of 2.4Ghz. I didn’t have any lag or dropouts when gaming on the other side of my living room.

Tronsmart claims the battery should be able to get around 20 hours of gameplay from a single charge (reduced to 5 hours if using vibration is active). I wasn’t able to clock up enough hours to drain the battery but 3-4 hours of gaming and the controller was still going strong. There’s also an auto-off mode to save battery.

Should You Buy It?

Tronsmart-Mars-G01-Review-04

The Tronsmart Mars G01 is a good wireless controller that offers plenty of flexibility. If need D-input support, the Tronsmart Mars G01 is a good option, with the pricier Logitech F710 being the only other comparable choice.

The controller itself is comfortable and the controls generally feel great, though the need to plug in a USB dongle will be a pain for some Android phone/tablet users who may prefer the freedom of a Bluetooth controller.

Getting One

The Tronsmart Mars G01 is available from GeekBuying for under $30. Use coupon EYIUBVVW to get another $5 off!

Check Price at GeekBuying

Alternatively, it’s available from Amazon.

Gamesir G3 Review: The Ultimate Gamers Controller?

The Gamesir G3 Enhanced Edition is a game controller that claims to do it all. Offering Bluetooth 4.0, 2.4GHz wireless and wired connection options, it boasts support for Android, iOS, Windows and Mac.

Couple that with the included phone holder (if you opt for the slightly pricier model) and you’ve got a go-anywhere controller that will be compatible with almost anything you throw at it.

However, is it any good? Read our Gamesir G3 Review to find out!

I want to say thanks to GearBest for sending me a sample to review.

Check Price at GearBest

Please note that there’s actually several models of the Gamesir G3. I’ve reviewed the Enhanced Edition which offers both Bluetooth and 2.4GHz wirelss support. The standard G3 only has Bluetooth connectivity.

What’s Inside The Box?

Gamesir-G3-Review-Inside-The-Box

Gamesir have provided an impressively comprehensive set of inclusions with the Gamesir G3:

  • 1x Gamesir G3 Controller
  • 1x USB Wireless Reciever
  • 1x Micro USB Charging Cable
  • 1x Dual Micro USB Cable
  • 1x Carry Bag
  • 1x English Instruction Manual
  • 1x Smartphone Holder

Gamesir G3 Review: Design

The Gamesir G3’s design is reminiscent of the PS4’s gamepad. It mimics the controller’s famous boomerang shape, with large side grips that fit comfortably in the hand. The unit’s lighter than the PS4 and Xbox One controllers but still feels well-made. I’m not worried about it breaking on me.

Gamesir-G3-Review-09

The whole unit is almost entirely black, save for some red details underneath the analog sticks. It looks elegant and fits well with the gamer aesthetic.

The top of the unit houses the micro USB charging port for charging the internal 600mAh battery. The bottom of the unit has 4 LEDs which light up based on the mode the controller is in.

Gamesir-G3-Review-11

The Gamesir G3 offers up a full set of controls, including a d-pad, dual analog sticks, four face buttons, four shoulder buttons (two of which are analog triggers), start and select buttons. There’s also turbo/clear buttons to allow automatic repeated keypresses – perfect for games requiring rapid, repeated keypresses.

Gamesir-G3-Review-02

The four face buttons (using the XBox’s ABXY layout) are glossy and transparent, lighting up with various colors when turned on. The effect is really cool. It can be turned off if you find it too distracting.

Gamesir-G3-Review-05

If you opt for the slightly pricier package, you’ll get the phone clip included. This lets you mount 4-6 inch smartphones onto the controller for an on-the-go gaming setup. The clip simply clamps over the controller and the phone holder can be tilted into the most comfortable position.

Gamesir-G3-Review-Clip

My issues with the Gamesir G3’s design are minor. The smartphone clip can be a little tight on the controller. Whilst this means it doesn’t budget when clipped on, it can be a little tricky to lock in initially but that’s a pretty minor complaint.

Gamesir G3 Review: Using It

Gamesir-G3-Review-08

The Gamesir G3 supports a heap of connectivity modes including X-input, Android, iOS and PS3 both wirelessly and wired. I don’t think I’ve ever seen a controller that’s so flexible.

Each of these are activated by holding the appropriate face button and powering the controller on using the Gamesir button in the center of the controller. For example, holding down the X button will activate the controllers X-input mode.

Gamesir-G3-Review-03

Using it on an Android device is easy. After booting the controller into Android mode and selecting the Gamesir G3 in my UGOOS UT3S Bluetooth menu, the controller was ready to use. Games with Built-in game pad support such as Riptide GP2 worked perfectly out of the box. Emulators required a little bit of setup as usual, mapping buttons and analog sticks, but this is pretty much par for the course for nearly every controller.

There’s even a mouse mode (activated by holding select and pressing X) that allows you to control the mouse cursor using the left analog stick. Handy for apps that require mouse support. I even used it to play Jetpack Joyride as controllers aren’t natively supported.

Gamesir-G3-Review-10

Using it on Windows is just as easy. After plugging in the included wireless USB reciever or via the micro USB cable, just boot your controller into X-input mode. The Gamesir G3 is automatically detected as an Xbox 360 controller and you’ll be able to play any supported games. I tested out both Sleeping Dogs and Spec Ops: The Line and both worked perfectly.

iOS support is limited to iCade so you’ll need to look for compatible games. Those hoping for MFI controller support should look elsewhere unless you’re willing to jailbreak.

In terms of feel, the Gamesir G3 holds up well. The buttons all have nice actuation, with satisfying tactile feedback when they’ve been pressed.

Gamesir-G3-Review-12

The analog sticks feel responsive. Each has a rubberised coating and textured rim to help with grip. It’s once again similar to the PS4 controller’s design, though the PS4 has a tiny bit more grip as the centers are also textured. That said, I never had my thumbs slip during some pretty intense gaming sessions so I think you’ll be find.

Gamesir-G3-Review-04

The d-pad also feels great. It’s not stiff or mushy and responds nicely to commands. I didn’t have any issues pulling off moves in classics such as Street Fighter.

Wireless range was great, whether I was using Bluetooth or 2.4GHz wireless. I didn’t have any issues playing games from around 6 meters away. That said, the 2.4GHz wireless range was superior due the technology itself versus Bluetooth.

Battery life has been good, with a single charge lasting quite a few hours without any signs of going flat. The company claims that you should be able to get around 18 hours of gameplay from a single charge and it seems like a reasonable estimate. There’s also a battery saving mode that turns the unit off after 5 minutes of inactivity or 1 minute after disconnection which is handy.

Should You Get One?

Gamesir-G3-Review-06

I have to admit, I was blown away by the Gamesir G3. The company clearly knows its audience and has designed a controller that’s comfortable, immensely flexible and doesn’t break the bank.

Whilst it doesn’t feel quite as solid as Sony’s controller, it more than makes up for it with its sheer flexibility. Being able to hook it up via wireless or via USB to a wide range of devices is excellent, plus mounting your smartphone using the clip is great for gaming on the go.

If you’re a multi-device gamer, the Gamesir G3 is the best controller I’ve found so far. I’ve even invested in a second one for gaming with friends. Highly recommended.

Getting One

The Gamesir G3 is available from GearBest from around $27 for the Gamesir G3 Enhanced Edition up to $39 for the Enhanced Edition bundled with the smartphone clip.

If you haven’t got a controller for your smartphone already, I’d fork out the extra for the clip as it’s an incredibly handy accessory.

Check Price at GearBest

Alternatively, it’s also available from Banggood, Amazon and Newegg.

Rikomagic MK06 Review: How’s Rikomagic’s First Amlogic S905 Box?

The Rikomagic MK06 is the company’s latest Android TV box and their first using the quadcore Amlogic S905. Opting for lower-end specifications with a price to match, is Rikomagic’s latest device a winner? Read our Rikomagic MK06 review to find out.

Thanks to Rikomagic for sending me a sample to review.

Check Price

Rikomagic MK06 Technical Specifications

[aps_product_specs id=”5293″]

What’s In The Box?

Rikomagic-MK06-Review-Inside-The-Box

Rikomagic have provided a fairly comprehensive set of inclusions in the box:

  • 1x Rikomagic MK06 unit
  • 1x Power Adapter
  • 1x IR Remote Control
  • 1x HDMI Cable
  • 1x USB-to-USB cable
  • 1x English Instruction Manual

Rikomagic MK06 Review: Design

Rikomagic-MK06-Review-Front

Rikomagic have played it safe with the design of their latest Android TV box. Reusing the case from the MK12 and MK68, the Rikomagic MK06 is a black square with a single rounded corner.

The top plate features a subtle geometric pattern and the whole unit is made of glossy plastic. Unfortunately, this means its probe to fingerprints so you’ll need to to keep it clean.

The design itself is unobtrusive however and fairly practical, with ample room to plug in cables and USB devices that you need to.

Ports are located on the left and rear of the unit. The left side houses two fullsize USB 2.0 ports and a micro SD card slot.

Rikomagic-MK06-Review-Left

Jumping over to the rear of MK06, there’s DC In, optical audio, Ethernet, HDMI out and another fullsize USB 2.0 port.

Rikomagic-MK06-Review-Back

Rikomagic have continued their “reuse” approach, packing in the same IR remote we’ve seen with their other Android boxes. That’s not necessarily a bad thing, as I’ve always found Rikomagic’s remotes pretty decent.

All the key functionality is here, with Android commands, directional buttons and volume controls. There’s even a mouse mode if you need it, though is suggest forking out for an Airmouse such as the Rikomagic MK705 for a much better experience.

Rikomagic-MK06-Review-Remote

Thankfully, the buttons are pretty quiet, unlike some of the cheap included remotes I’ve seen to date so they’re not distracting when used. Range was fine, able to reach across my lounge room with ease.

Rikomagic MK06 Review: Using It

The Rikomagic MK06 boots automatically when plugged in. A cold boot takes around 59 seconds With a wireless keyboard and mouse plugged in. Resuming from standby is instant.

The Rikomagic MK06’s UI is the same as we’ve seen on previous models, with various tiles for key apps, themed collections of apps (such as games) and the app drawer.

Rikomagic-MK06-Review-Android-01

The launcher is definitely TV friendly, though animations aren’t smooth enough, making it feel less polished compared to other launchers I’ve seen shipped with TV boxes.

There’s a few preinstalled apps, with Kodi 15.2, Media Center, Miracast, Skype and, interestingly, iPerf all making an appearance. Kodi 15.2 came with a whole bunch of add-ons preinstalled so I simply uninstalled it and installed a stock version of Kodi 16.0 from the Google Play store.

Speaking of the Google Play Store, it works and the device is rooted out of the box for those that need it.

Rikomagic-MK06-Review-Android-02

HDMI CEC is supported and worked well with my Samsung TV, allowing me to use the TV’s remote to control the Android box.

The MK06 also features a single 4.08GB partition with 3.5GB free out of the box, making it much easier for users to use all of the included storage how they want. 3.5GB isn’t a lot though so you’ll need to be mindful of how many apps you need to install.

The Rikomagic MK06 is also the first Rikomagic box to come with OTA update support. Unfortunately, I didn’t have a chance to actually test it as my box was already pre-installed with the latest firmware.

Rikomagic-MK06-Review-OTA

The firmware feels pretty stable. However, I did occasionally experience a several-second pause when exiting apps sometimes. I also had issues with luckluster 3D performance and benchmarks failing (more on that below).

Rikomagic MK06 Review: Media Playback

Rikomagic-MK06-Review-Kodi

The Rikomagic MK06 came preinstalled with Kodi 15.2. However, I had issues with video only rendering in the top left of the screen. Updating to Kodi 16.0 via the Google Play Store seemed to fix the issue so I’ve used that version for my testing.

Codec Video Performance (Kodi 16.0)
1080p 3D SBS H.264 OK
1080p 3D ABL H.264 OK
1080p24 H.264 OK
1080p High Bitrate H.264 OK
1080p60 H.264 OK
720p50 H.264 OK
1080i25 H.264 OK
4K 30FPS H.264 OK
4K 60FPS H.264 Unwatchable (Video lags behind Audio)
1080p24 HEVC OK
4K 30FPS 8-bit HEVC OK
4K 30FPS 10-bit HEVC Not Supported (Crashed Kodi)
1080p VP8 OK
720p Hi10p OK
1080p Hi10p Unwatchable (Decoding Issues)
1080p MPEG2 OK
1080p VC1 OK
Unencrypted Bluray ISO (Sintel) OK (Kodi reported some skipped frames though)

Media playback was generally good, handling all of the most common file formats with ease.

Deinterlacing performance was good, without any obvious artifacting on interlaced samples.

Automatic framerate switching isn’t supported unfortunately, meaning 23.976/24Hz content may exhibit judder depending on the video.

Rikomagic-MK06-Review-07

5.1 Audio Passthrough

Dolby Digital 5.1 passthrough via HDMI worked fine via Kodi 16.0

Netflix

Netflix works via the Netflix app. However, the resolution is limited to 480p like most Android boxes due to the lack of Netflix certification.

AirPlay

Using the included Media Center app, both AirPlay and AirPlay Mirroring worked fine using an iPhone 6 on iOS9.

External Storage Support

Playing back movies from my 2.5″ USB-powered HDD and USB flash drive worked perfectly.

Rikomagic MK06 Review: Gaming Performance

Rikomagic-MK06-Review-Beach-Buggy-Racing

To test gaming performance, I installed 2 games,1 2D and 1 3D title:

Despite using the Amlogic S905 like a number of other Android TV boxes, the Rikomagic MK06 performed worse than other boxes I’ve tested to date.

Rikomagic-MK06-Review-Jetpack-Joyride

Whilst the simpler Jetpack Joyride was perfectly smooth, playing Beach Buggy Racing at 1080p on maximum settings struggled to achieve a playable framerate. Lowering the graphics settings to the default lead to a much more pleasant experience.

Gaming Controllers and Bluetooth

I didn’t have any issues hooking up my GameSir G3 via Bluetooth and use it to play Beach Buggy Racing.

SixAxis Compatibility Checker reports that the MK06 should be compatible so you should be able to hook up your PS3 controller via Bluetooth.

Rikomagic-MK06-Review-03

Rikomagic MK06 Review: Networking

Networking performance was tested using Wifi performance was tested using Wifi Speed Test, conducting 3 tests and averaging the results. My router is approximately 5m away, with a single wall between the router and the device. WiFi performance is heavily impacted by a number of factors so your performance may vary.

Wireless Performance

Wireless performance was pretty good on the Rikomagic MK06, with upload and download speeds of 40.6Mbps and 49.8Mbps respectively.

In terms of real world performance, I was able to stream 1080p and 4K H.264 videos from my NFS share without buffering. However, I did experience terrible buffering at one stage that seemed to resolve itself after a reboot so I’m not sure what happened.

Rikomagic-MK06-Review-04

Ethernet Performance

Ethernet performance was reasonable, with upload and download speeds of 627.8Mbps and 873.9Mbps respectively.

Rikomagic MK06 Review: Benchmarks

Benchmark Score
Antutu 6.0  25390
Antutu Video Tester 3.0  893
3DMark Ice Storm Unlimited  Wouldn’t Finish
3DMark Ice Storm Extreme  4261
GeekBench 3 Single Core  600
GeekBench 3 Multi Core  1248

Benchmarking performance was either on par or lower than other Amlogic S905 boxes I’ve tested to date. Antutu and GeekBench 3 Multi-Core were noticeably lower than competing boxes.

Interestingly, Antutu kept reporting that the MK06 didn’t complete the 3D component of the benchmark, which is why the score is so much lower than other Amlogic S905 boxes.

Furthermore, I wasn’t able to get a score for Ice Storm Unlimited in 3DMark as the benchmark kept terminating before it finished.

Having so many issues with the 3D side suggests there’s either a hardware issue or Rikomagic have a lot more work to do with the firmware.

Rikomagic MK06 Review: Power Consumption

Off Standby Idle 1080p24 Video Under Load
 0W 0.5W  2.5W  3.9W  6.5W

Should You Get One?

Rikomagic-MK06-Review-05

The Rikomagic MK06 is a flawed Android TV box from Rikomagic. It handled media playback well, though no automatic framerate switching in Kodi is disappointing. However, this combined with lackluster 3D gaming performance make it hard to recommend over more polished Amlogic S905 boxes available.

Getting One

You can get the Rikomagic MK06 from GearBest for around $67.

Check Price